|
All illustrations, text and designs contained in this site are
© Copyright 1982-2012 Kannik's Korner, or its licensors.
All rights are reserved, and none may be used without prior written permission.
| |
Further Information about Making and
Wearing Bonnets
A SPECIAL BONNET SAFETY NOTE:
Bonnets distort the wearer's hearing!
It is very, very important to know and remember this, both
for yourself, your children, and for others wearing a bonnet! Sounds
may seem to come from behind you, when they are your own footsteps, or you may not be able
to tell where a sound is coming from - such as a vehicle (be it automobile, or horse drawn
carriage). This can put the wearer in danger! Be sure to teach your girls to remove their
bonnet if they are crossing a street or if they are in a very busy place, especially with
large animals. If you loan your bonnet to someone, be sure to loan it with a warning!
|
|
Updated 9-21-2004 |
 |
 |
| Bonnet shown in The Marquess of
Granby aiding a Sick Soldier, by Edward Penny, 1765 [detail] |
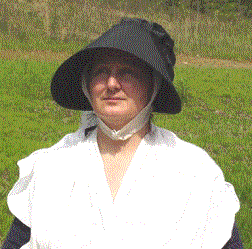
Bonnet made from the Kannik's Korner
graded down size of the pattern originally published in Instructions for Cutting out
Apparel for the Poor, 1789 |
| |
|
The
cut of our girls' and women's bonnet patterns are taken directly from the 1789
"Instructions for Cutting Apparel for the Poor", with one exception - I added a
smaller size in the women's pattern. This is a large bonnet, and I felt that most women
would not want it that large today. I also did a lot of research (and continued to
research steadily for several years) on bonnets, and have lots of information about
bonnets being worn, but less on actual shapes. Ah, if only artists had been encouraged by
the wealthy paying clients to paint the common folks here in the
colonies.... I have found one well documented bonnet, thanks to Karen
Mullian, which is very close to the pattern. It belonged to Phebe (Massey) Miller, who
died in 1789. Karen writes, "Miller's bonnet was closer to the smaller style
available in [Kannik's] pattern. She was a Quaker, but don't let that put you off. Amelia
Gummere who wrote 'The Quaker: A Study in Costume', indicated that Quakers were generally
ten years behind in fashion. If true, this would place the common popularity of this
bonnet at 1779."
See the illustrations above for a comparison of the one
illustrated in the 1765 painting, and the one made from Kannik's Korner's slightly graded
down size of the original pattern first published in 1789. From every angle there is a
slightly different shape appearance, due to the perspective. The stiffness of the bonnet
board front also makes a difference in how it flares out. The stiffness of the silk, or
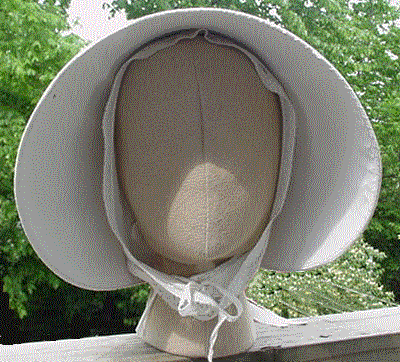
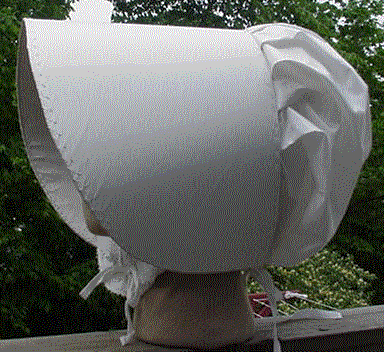
fabric, makes a difference in how the caul stands in the back. Below are photos of a
bonnet made from the original pattern. This one is white silk, and I wired the front edge,
which is seen in some originals. It does not seem to make a lot of difference, and I feel
it is not worth the time.
The bonnet worn in the painting The Silver Age,
dated mid-1770's, by Henry Walton (as seen in "Painting in England 1700-1850,
Collection of Mr & Mrs Paul Mellon, Virginia Museum of Fine Arts" 1963*) is also
very close. This is, in my opinion, a young girl, rather than a young woman. I have not
found out yet what color her bonnet is, as I have not seen a color reprint, only black and
white, but it will not surprise me to see it is black. Some of the Sandby drawings also
look very similar - if you see the bonnet worn more from the front - the sides flare out
some, which is not shown in my pattern cover illustration. |
| |
|
 |
 |
Bonnet made from original 1789 pattern,
Kannik's Korner KK-6601, front view |
Bonnet made from original 1789 pattern,
Kannik's Korner KK-6601, side view
[The radiating lines on the front are in the photo, not the bonnet.] |
|
|
Some
notes on the book Instructions for Cutting out Apparel for the Poor: This is a
compilation of patterns and cutting methods used by one woman in running a charity
organization. She had used these patterns for some time before being pressed by friends to
publish them for the benefit of other charities and home use. Knowing how long it takes in
this day of computerization to publish a book, I know it must have taken at least one, if
not two years to publish this work, as the plates had to be hand engraved and the type set
by hand, and the books printed one page at a time, and hand sewn and bound. That would put
the date of concept at 1787, and since she had been using these methods for some time, and
these patterns were not for use for the high fashion, but rather for the poor, we can
safely assume that they were in use for at least five to ten years prior, if not much
longer. That puts us safely into the Rev. War era, for those who need solid
documentation!!!! This, coupled with all the references to bonnets worn by lower classes,
as well as the bonnet shown in Silver Age (dated to mid-1770's) confirms the use of this
style.
I have experimented with different cloth, and find that
silk taffeta is really wonderful for a bonnet. Believe it or not, black does not water
spot! Mud can be dried and brushed off! Is it any wonder they wore them??? Do not use a
very heavy cloth, as it will be too bulky to draw up tight enough at the back bottom of
the caul! Again, the silk is best for this reason, as well.
It is important to make the front of
"pasteboard", which is today called single thickness chipboard (no, not the wood
construction kind) that picture framing shops usually stock (or a good art supply store).
Be sure it is NOT the laminated pasteboard - i.e. it should NOT have a layer
of paper glued to it, as it will cause it to fracture when bent to the
bonnet shape. Pasteboard, as most paper, has a "grain", and if you
can figure out which way the pasteboard curls best, use that curl going from
side to side of the front of the bonnet, rather than front to back, so that
it will help to make the shape of the bonnet, rather than work against it. The modern Amish plastic bonnet board is NOT as stiff as shellacked pasteboard, and is not
a good substitute for this bonnet. The shellac process adds stiffness to the pasteboard.
The pasteboard MUST be shellacked - and do it two coats on each side! I usually
stitch a loop of heavy thread through one corner of the front and rig up
some way to hang it, and do it on all sides, to
save time. (Yes, you get gooey fingers! Be sure to have denatured alcohol
for clean up.) This is the hardest part about making a bonnet - waiting for it to dry! It
takes at least a day to dry for each coat. If you are planning to do a light color silk,
and especially white, you should pre-paint the pasteboard white, and then shellac it, as it
will appear very dull beneath the white silk compared to the back piece - the caul - if it
is not painted. NOTE: Shellac has a three year maximum shelf life! If you
purchase a can of shellac, be sure to check the date on the can - usually it
is the manufacture date on the bottom - and get one as fresh as possible,
otherwise it will not dry properly and remain very sticky. After you shellac
the front, and let it dry, be careful where you put it, as it will stick to
other fronts, or other things, and be ruined. We have used waxed paper
between them, but even that sticks at times. For more specific information
on bonnet board go to www.kannikskorner.com/infobonnetqs.htm.
If you have a painting of a bonnet in mind which strikes
you as particularly attractive, use the same basic construction method given in our
patterns, and experiment with heavy paper to get the shape of front that you want. Once
the bonnet is constructed, you can decorate it or keep it plain. You can also add ties to
it of self fabric - they were not included in the original materials list nor directions,
but are documented by other sources. They do help on windy days!
If your bonnet gets wet, just gently reshape the front with
your fingers, and set it someplace safe to dry. Once dry, it may have small, insignificant
"dents" in the pasteboard, but will still be a useable bonnet. It is best on
rainy days to pull the hood of your cloak over the bonnet to help keep it dry. (The hood
of our short cloak pattern, also from the same book, was obviously designed to fit over
this bonnet.)
One amazing thing about this particular bonnet
pattern is that it can be ungathered at the back, and laid almost flat! This means that it
can travel in a box or trunk safely (and a fairly plain bonnet even makes it in a
suitcase) without crushing! And WOW, do we travel, right ladies?
Hope that this helps to encourage you to at least
experiment with bonnet making. It is really fun, and not all that costly.
* The Silver Age, by Henry Walton, is in the collection of Yale Center for British
Art, New Haven, Connecticut, accession no. B.1981.25.650.
© 1999-2004 Kannik's Korner |
|
|
|
